Webhooks Guide
Webhooks allow you to receive real-time notifications when specific events occur in our platform. Instead of continuously polling for updates, your endpoint is called automatically whenever a new event happens.
By configuring webhooks in your account, you can:
- Automate workflows based on real-time data (e.g., new visits, new visitors).
- Keep your system in sync without manual intervention.
- Reduce overhead of constantly checking for new data.
Creating a Webhook
Navigate to the Webhooks Section: In your dashboard, go to Settings → Webhooks.
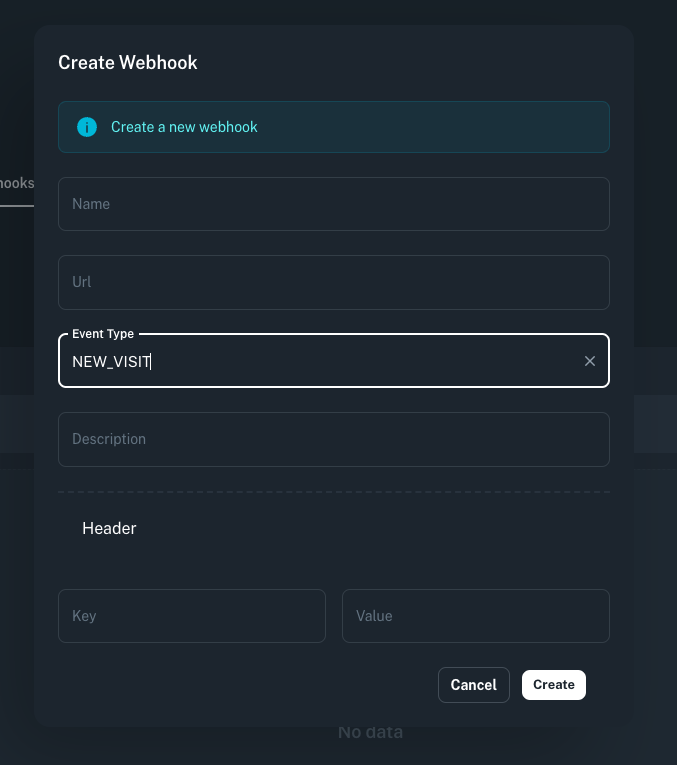
Click “Create Webhook”: You’ll see a form like this:

- Name: A friendly name to identify your webhook (e.g., “Notify My CRM”).
- URL: The endpoint where our system will send POST requests.
- Event Type: The specific event(s) that trigger your webhook. we have:
- NEW_VISIT: Fired when a new visit occurs.
- NEW_VISITOR: Fired when a new visitor is created.
- Description: Optional notes about this webhook (e.g., “Triggers Slack notifications”).
- Header(s): If you need custom headers for authentication or versioning, add them here.
Click “Create”: Your webhook is now registered. You’ll see it in the webhook list, where you can enable/disable or edit it.
Event Types
Currently, we support these webhook events:
NEW_VISIT
Triggered whenever a new visit is recorded in our system.NEW_VISITOR
Triggered whenever a new visitor (unique user) appears in our system.
Authentication
To ensure that requests genuinely come from us, we recommend adding a shared secret header:
- Header Name:
X-Webhook-Signature(or any custom header name you prefer) - Header Value: A secret token that your application can verify.
Verifying the Signature
When your server receives a webhook:
- Extract the signature from
X-Webhook-Signature. - Compare it against a known secret or use an HMAC hash approach.
- If the signature is valid, proceed to handle the payload.
Tip: Always use HTTPS to secure the transport layer.
Expected Payload
We send a POST request to your specified URL with the following JSON body structure:
{
  "id": "unique_visit_id",
  "url": "https://example.com/entry-point",
  "params": {
    "utm_source": "newsletter",
    "utm_medium": "email",
    "utm_campaign": "spring_sale"
  },
  "referrer": "https://google.com",
  "date": "2024-12-22T14:30:00Z",
  "ip": "192.168.1.1",
  "visitor": {
    "id": "unique_visitor_id",
    "firstSeen": "2023-01-01T12:00:00Z",
    "company": {
      "name": "Example Corp",
      "domain": "example.com"
    }
  },
  "location": {
    "country": "United States",
    "city": "San Francisco",
    "state": "California"
  },
  "trafficSource": {
    "channel": "Organic Search",
    "source": "Google",
    "campaign": "Holiday Campaign"
  },
  "device": {
    "model": "iPhone 14",
    "os": "iOS 17",
    "gpu": "Apple GPU",
    "hardwareConcurrency": "6"
  },
  "browser": {
    "name": "Safari",
    "version": "17.0",
    "vendor": "Apple"
  },
  "timezone": "America/Los_Angeles",
  "screen": {
    "height": "2532",
    "width": "1170",
    "touch": "true"
  }
}